HiStruct Roofs for roofers
HiStruct is a web application that allows easy collaboration or sharing of a project or parts of a project. In this way, you can give a preview of the 3D roof model to the end customer, collaborate on the project with a colleague or an installation company. It is used to quickly create quotations, bills of materials and laying plans for roofing, flashings, flashings and gutter systems. The system allows for several entry modes to increase efficiency when working with a project.
How to process a roof enquiry in HiStruct?
1. 1. I model the roof areas by redrawing or using the generator 1. Edit the generated layout 1. select the flashing and eaves system or have it automatically generated 1. I get BOMs, documents, drawings
Done, I'm going for a coffee 😊
HiStruct can be extensively customized. The system for laying roof fittings, flashings, flashings and guttering is set up separately for each individual manufacturer in a separate set of configuration files. It contains information on how the roof area is to be laid with fittings, possible colour combinations, information on the bill of materials and more. These and other customizations are done within the customization project.
Now, in more detail...
1. I create a project with or without a map
I'm processing a new request. The first thing I want to do is start a new project. A project is a place that can contain one or more components - 3D models, i.e. configurations, variants or parts. The project page has two views. The default view is a simple listing of established projects with components. If I also want to store a location for a project, I can use the map view of the projects, where I can also specify a location from the map.
2. Modeling roof surfaces
We usually start by selecting the type of roofing, flashings and gutter system (these can be changed later) from the libraries. This is followed by creating a roof model from the individual roof planes, possibly using more advanced modelling methods. The appropriate modelling method depends on the available documents for a particular enquiry. The better the quality of the documentation, the more efficiently the modelling process can be carried out.
😊 I only have a few sketches with dimensions
If the roof shape is simple, I can model it by inserting roof surfaces with predefined shapes or create a generic roof surface shape in the modelling space. The general input mode uses tracing and other familiar input tools, similar to other CAD programs. If the slope is known, the roof planes can be rotated and moved in space to match the actual roof shape. If the roof can be built in space with sufficient accuracy, the flashing and gutter generator can be used.
😊😊 I have a vector drawing of the roof plan
If I have a vector drawing, it will be easier to model. It is possible to import files in *.dxf format into HiStruct, or convert vector .pdf to .dxf to [importDxf.md). The imported *.dxf allows for easy snapping and entering of individual roof surfaces is done by clicking through the floor plan with the option of adding a slope for each roof surface. The advantage is the accuracy and ease of making a 3D model. Almost always the flashing and eaves generator can be used.
😊😊😊 I only have an outline and need to design a roof
For example, if you have a brand new roof and only have an outline, HiStruct has an innovative tool that automatically designs the final roof shape, pitches, flashings and gutter system. To do this, it is of course possible to import *.dxf files or convert vector .pdf to .dxf and import them into HiStruct.
😊😊😊😊 I have a 3D model from a digital orientation
A model from a digital orientation is a win. If I have this model in a suitable format (3D .pdf or directly .obj), I can import the geometry straight away. I can import *.obj into HiStruct, or convert 3D .pdf to .obj and import that into HiStruct.
After importing, HiStruct will offer recognized surfaces from which you can choose how to convert them to HiStruct geometry. The Surface Generator then performs the conversion to roof or wall cladding surfaces, which can then be worked on in the normal way.
After the roof surfaces have been generated, I can still use roofFlashing Generator. This method of input is almost work-free.
3. Laying the roofing
For us, roofing and flashing libraries mean not only size and color, but the whole approach to sheathing specific roof areas. Thanks to the variable generator, we are able to enter the specific installation procedure of a particular manufacturer's roofing into the library. We do this as part of customisation project. A well-designed generator then eliminates the necessary interventions in the automatic laying process.
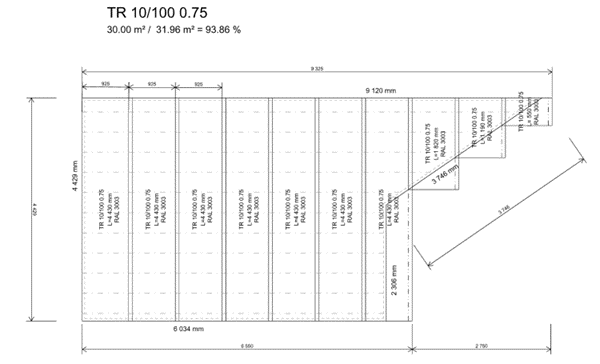
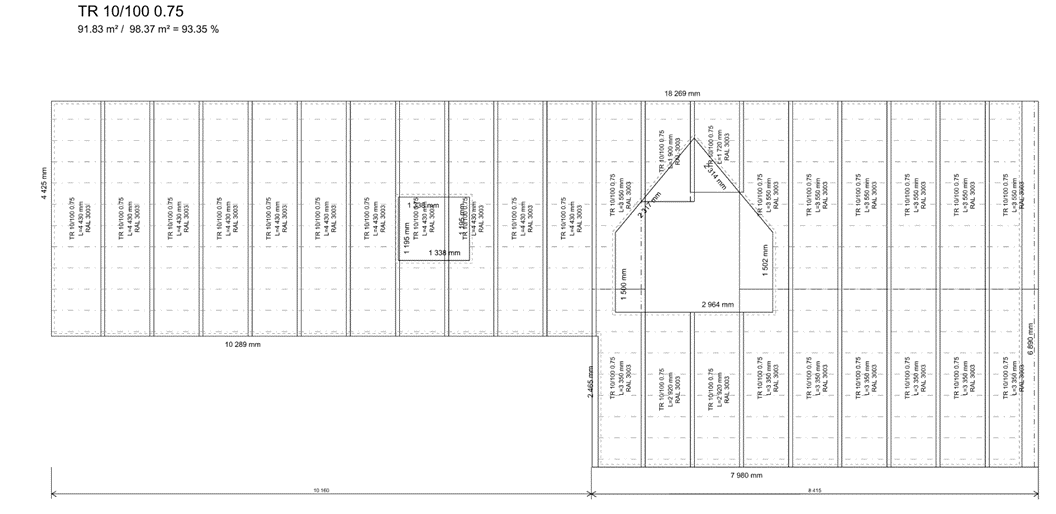
The RoofPolygonTilling takes place automatically according to the configuration settings of the roofing. It is also possible to adjust the start of the laying process to achieve the smallest possible cut. The information about the ratio of the cut to the roof plane area is displayed during the laying modification.
4. How to use the flashing and gutter system?
Of course, flashings, flashings and gutter system can be specified anywhere in the space by grabbing onto already specified roof surfaces, imported geometry, or other objects. In addition, it is possible to use the addition of edges to individual sides of roof planes, or directly to the generator over a group of roof planes. For the generated elements, the slope of the associated roof planes is automatically adjusted, thus correctly setting the bending angles of the flashings and hooks of the eaves system.
HiStruct includes comprehensive gutter system settings options. By specifying a polyline defining the downstream gutter, the gutter slope can be set. For each part of the gutter, we also set the slope of the downstream roof plane for the correct calculation of the bend and hook length. It is possible to add clamps to each gutter section, which have additional setting options.
5. Pieces, documents, drawings... simply outputs
Sketch The Piece List is created automatically from roof parts inserted into the model space. The individual parts of the model have information next to them about which parts they are created from, with the possibility of editing the number and possibly adding more items.
The way the BOM is generated can then be modified within the customisation project.
Offer The generated BOM, complete with a link to the manufacturer's price list, can be part of the offer. However, the offer can be prepared without the BOM. The method of generating the quote can then be modified within the customisation project.
Plans The Layout Drawings are generated automatically from the specified geometry and any changes made by the user. If necessary, additional notes or annotations can be added to the drawing.